Paint doesn’t crack for one reason. It’s almost always a combination: the wrong prep, the wrong timing, the wrong product, or water getting somewhere it shouldn’t. New England’s climate — bitter winters, humid summers, 40-plus freeze-thaw cycles a year — puts paint through more stress than most guidance accounts for.
What Causes Paint to Crack? The 7 Most Common Reasons
While New England’s challenging climate is a major contributor to paint wear, it is rarely the only factor involved. These seven common issues are the primary reasons paint jobs across Massachusetts and New Hampshire require premature maintenance.
1. Poor Surface Preparation Before Painting
Skipping prep is the single most reliable way to guarantee a paint job fails early. Paint needs a clean, stable surface to bond properly, without it, adhesion fails, and cracking shows up within a season or two. In New England, where surfaces take a beating year-round, thorough prep isn’t optional. It’s what separates a lasting result from a repair call in 18 months.
What proper surface preparation includes:
- Thorough cleaning to remove dirt, mildew, and chalking
- Scraping off all loose, cracking, or flaking paint
- Sanding to smooth edges and feather transitions
- Filling cracks, holes, and gaps with exterior-grade materials
- Priming all bare wood and repaired areas
Each of these steps builds on the last. Skip one, and the entire paint system loses its foundation. A coat over improperly prepped surfaces might look fine on day one, but harsh New England weather will find those weak spots fast. At MJR, we believe in doing things right from the ground up, using premium finishes built to actually last through our toughest winters.
2. Applying Paint in Extreme Temperatures or Humidity
Timing matters as much as technique. Paint chemistry depends on specific temperature and humidity windows to cure correctly. In Massachusetts and New Hampshire, those opportunities can be short, and missing them results in a film that looks finished but hasn’t actually set up the way it should.
Ideal application conditions:
| Condition | Ideal Range |
| Air temperature | 50°F to 85°F |
| Humidity | Below 50% |
| Rain forecast | None for at least 24 hours |
| Surface temperature | Same range as air temperature |
What happens outside these ranges:
- Too cold (below 50°F): Resins and binders don’t coalesce correctly, leaving a brittle layer prone to cracking
- Too hot or humid: Paint skins over before underlying layers dry, trapping moisture that pushes out as cracks or bubbles
3. Using Low-Quality or Incompatible Paint Products
Not all paints are built the same, and in New England’s climate, those differences show up fast. Lower-quality products don’t have the formulation to handle what homes here deal with every year.
Why paint quality matters in New England:
Lower-quality paints contain fewer solids, cheaper binders, and less flexible resins. They cover walls fine on application day, but lack the elasticity to survive constant expansion and contraction cycles.
The incompatibility problem: Applying latex paint directly over old oil-based paint without a bonding primer is a classic failure scenario. Latex and oil-based products expand and contract at different rates; the new layer eventually separates, creating cracks and peeling.
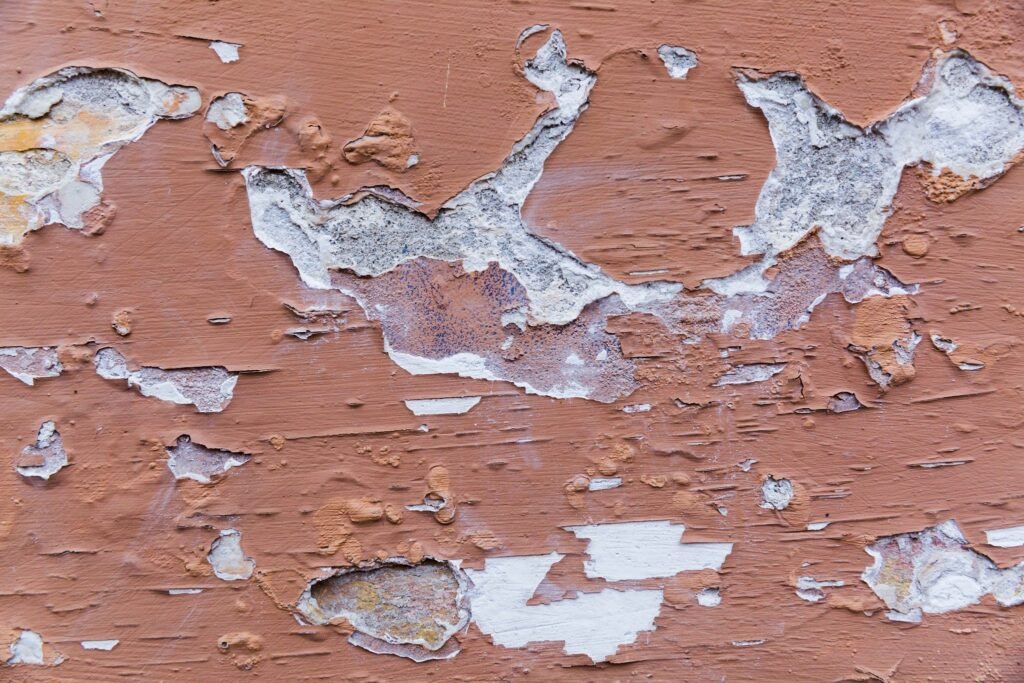
4. Moisture Trapped Behind the Paint Film
Water is the most destructive force working against your paint. It doesn’t need a visible leak, moisture finds its way in through dozens of entry points, sits trapped behind the film, and pushes outward as it evaporates.
In New England homes, ice dams and seasonal humidity swings make this one of the most common causes of recurring paint failure.
Common sources of moisture intrusion:
- Roof leaks and ice dams
- Plumbing issues
- Bathrooms or kitchens without proper ventilation
- Attics with inadequate airflow
- Basements with chronic dampness
- Missing or insufficient vapor barriers
As trapped moisture evaporates, it pushes outward, causing paint to bubble, blister, crack, and peel away from the surface.
Ice dams are a particularly destructive regional problem. Moisture forced into wall cavities often shows up months later as cracking or peeling on exterior siding or interior ceilings.
If paint keeps cracking in the same spot, especially around windows or along rooflines, moisture intrusion is likely the culprit. Repainting without fixing the source is just a temporary bandage.
5. Too Many Coats or Excessively Thick Application
More paint does not mean better protection. Applying too many accumulated layers, or single coats that are too thick, creates its own set of failure modes. The outer surface can’t cure correctly when the layers underneath are still moving, and that tension eventually works its way to the surface as cracks.
Excessively thick single coats cause problems, too:
- The outer surface dries and skins over
- Interior remains wet underneath
- The trapped inner layer eventually dries and shrinks
- It pulls against the rigid outer surface, cracking from within
6. Sun and UV Exposure on South-Facing Walls
UV radiation breaks down the binders that hold paint together. New England’s combination of UV degradation plus freezing temperatures creates a particularly destructive cycle:
- Summer: UV weakens the paint film and reduces flexibility
- Winter: Freeze-thaw cycles stress the already-compromised film repeatedly until it fails
This is why south-facing walls often need repainting sooner than north-facing walls on the same house. Darker colors absorb more heat and degrade faster, color choice matters here too.
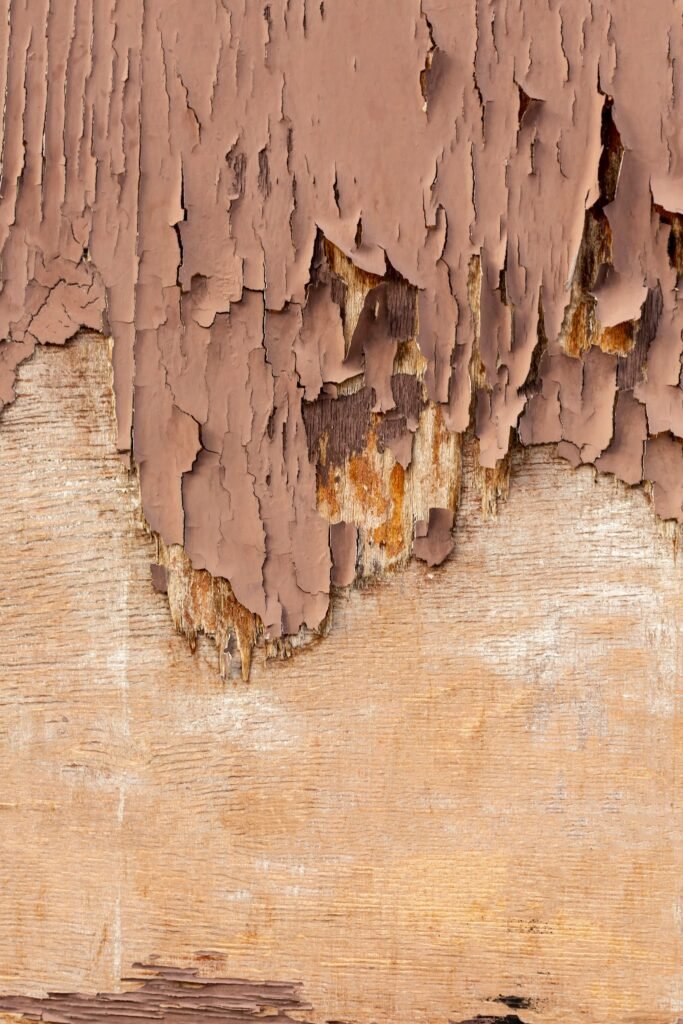
7. Natural Wood Movement and Aging Substrates
Wood moves. It expands when it absorbs moisture and contracts when it dries out, and it does this constantly across every season. Paint applied over wood needs enough flexibility to move with it. On older homes, where the wood itself has aged and become more porous, that challenge gets harder.
This becomes a paint problem when:
- The coating is too rigid to flex with the substrate
- Wood has aged and become more porous and prone to moisture absorption
- Knots dry out and shrink
- End grain absorbs water preferentially
- Joints between boards open up
High-quality, flexible paint applied over properly primed wood handles seasonal movement far better than cheap, brittle coatings. For decks, fences, and outdoor structures — which face moisture from all sides — proper product selection is essential.
How New England Weather Destroys Paint Jobs Faster
Most painting guidance is written for someone in San Diego. It doesn’t account for what homes in Massachusetts and New Hampshire face every year.
What your home’s paint endures annually:
| Stressor | New England Reality |
| Temperature range | 0°F to 95°F+ — nearly a 100-degree swing |
| Freeze-thaw cycles | 40+ per winter, each stressing paint films |
| Humidity variation | Bone-dry heated interiors vs. 80%+ summer humidity |
| Wind-driven rain | Nor’easters force moisture directly against siding |
| Coastal salt air | Accelerates paint degradation and substrate corrosion (South Shore) |
| Ice dams | Trap water that works into wall cavities from above |
By comparison, a home in a temperate climate might experience a 40-degree annual temperature range, zero freeze-thaw cycles, and minimal wind-driven moisture. That paint simply doesn’t work as hard. This is why painting practices that work in milder regions often fail here.
How to Tell What Type of Paint Cracking You Have
The pattern, depth, and location of cracks tell a story about what went wrong. Before you pick up a scraper or call a painter, identify what you’re dealing with.
Cracking Type Comparison
| Type | What It Looks Like | Common Causes | Severity | What To Do | |
| Hairline cracks | Fine, shallow lines on the surface; don’t penetrate to the substrate | Paint dried too fast, single coat too thick, minor substrate movement | Low–Moderate | Sand smooth, repaint with proper prep | |
| Alligator cracks | Deep, intersecting pattern resembling reptile skin | Too many accumulated layers, latex over oil, aged, brittle paint | High | Strip to bare wood, restart paint system | |
| Flaking | Paint lifts and chips away in pieces or sheets | Moisture intrusion, poor adhesion, incompatible products | Moderate–High | Remove all loose paint, address moisture source, prime and repaint |
Not sure what’s going on with your paint? We can take a look. Call Us Today!
When Cracking Signals a Bigger Problem
Paint cracking can be the visible symptom of something more serious. Watch for these warning signs:
- Soft or spongy wood behind cracked paint, press with a screwdriver or awl. If the wood gives easily, you’re dealing with rot that must be repaired before painting
- Mold or mildew is found on the surface or behind peeling paint, the moisture source must be identified and resolved first
- Recurring cracking in the same spot after repainting suggests a hidden leak, drainage issue, or structural detail directing water into the wall
- Staining or discoloration alongside cracks, water stains, rust bleed-through, or tannin staining all indicate moisture problems beyond the paint layer
How to Stop Paint from Cracking: A Step-by-Step Approach
Step 1: Inspect and Evaluate
Identify cracking patterns, test adhesion, check for moisture, and probe for rot.
Step 2: Clean Thoroughly
Power wash to remove dirt, mildew, chalking, and loose debris.
Step 3: Scrape All Failing Paint
Every bit of compromised coating must come off. On homes built before 1978, lead-safe practices are mandatory.
Step 4: Sand
Feather edges where scraped areas meet intact paint.
Step 5: Fill and Caulk
Seal gaps and smooth damaged areas, especially around trim and siding joints.
Step 6: Fix Moisture Sources
If moisture caused the cracking, fix the source before painting. Non-negotiable.
Step 7: Prime
All bare wood and repaired areas. This creates the critical bond between substrate and topcoat.
Step 8: Choose the Right Products
| Situation | Primer Type |
| Bare or weathered wood | Oil-based primer |
| Chalky or glossy surfaces | Bonding primer |
| Tannin bleed, water stains, and knot bleed | Stain-blocking primer |
DIY vs. Hiring a Professional: Which Situations Call for Which?
Some hairline cracks on an interior wall are easy enough to touch up yourself over a weekend. But when it comes to deep cracking on your exterior siding or trim, trying to DIY it is a massive risk. The stakes are much higher than just looks, getting it wrong can lead to serious moisture damage down the road.
Here is a straightforward look at which jobs are safe for a weekend project, and which ones genuinely require a professional team.
| Situation | DIY or Pro? |
| Small interior touch-up, isolated hairline cracks | DIY |
| Minor surface cracking in a low-traffic area | DIY |
| Widespread exterior cracking on siding or trim | Pro |
| Alligator cracking requires stripping | Pro |
| Cracking with suspected moisture, rot, or substrate failure | Pro |
| Homes built before 1978 (lead paint concerns) | Pro (certified handling required) |
A professional painter brings diagnostic ability and the experience to examine cracking paint and identify not just what’s happening on the surface, but why it’s happening underneath.
Your Paint Is Your Home’s First Line of Defense. Treat It That Way
Paint protects wood from moisture, UV rays, and brutal New England winters. When it fails, it’s not just a surface issue, it opens the door to rot, water damage, and repair bills that cost far more than a proper paint job.
At MJR Painting, we do things right from the start. We’re a veteran-owned, family-run team with over 700 completed projects across Massachusetts and New Hampshire since 2016. By pairing premium Benjamin Moore products with meticulous prep work, we ensure your paint job is built to withstand our local climate and actually last. Every project we touch starts with a thorough surface evaluation, because what you do before you paint is exactly what makes it endure for years.
Dealing with cracking paint on your MA or NH home? Request a free assessment from MJR Painting.
FAQs
Can I just paint over cracked paint?
No, not if you want results that last. Painting over cracked paint without addressing the surface first means the new coat has nothing solid to bond to. The underlying failure will push through within a season. At minimum, all loose and cracked paint needs to be scraped, the surface sanded smooth, and bare areas primed before you apply anything new. For widespread or deep cracking, the full prep process applies.
Why does my paint crack every few years?
Recurring cracking usually points to an unresolved root cause, most often moisture intrusion, an incompatible paint system, or inadequate prep on the original job. If paint keeps failing in the same spot, simply repainting the surface won’t fix it. The underlying issue—whether it’s a slow leak, a drainage problem, or a missing vapor barrier, must be identified and corrected before any new paint goes on.
How do I know if my cracked paint contains lead?
If your home was built before 1978, assume lead paint is present until proven otherwise. Test kits are available at hardware stores, but professional testing is more reliable. Any scraping, sanding, or paint removal on a pre-1978 home requires lead-safe work practices, proper containment, protective equipment, and safe disposal. This isn’t optional. Hiring a certified contractor who follows EPA RRP (Renovation, Repair, and Painting) guidelines is the safest approach.
What’s the best time to repaint a house in New England?
Late spring through early fall is the practical window in most of Massachusetts and New Hampshire. You need consistent temperatures above 50°F, low humidity, and no rain in the forecast for at least 24 hours after application. Early June and September tend to offer the best combination of stable temperatures and lower humidity. Avoid painting during summer heat waves, when surfaces can exceed 85°F and cause the same curing problems as cold weather.